Caption
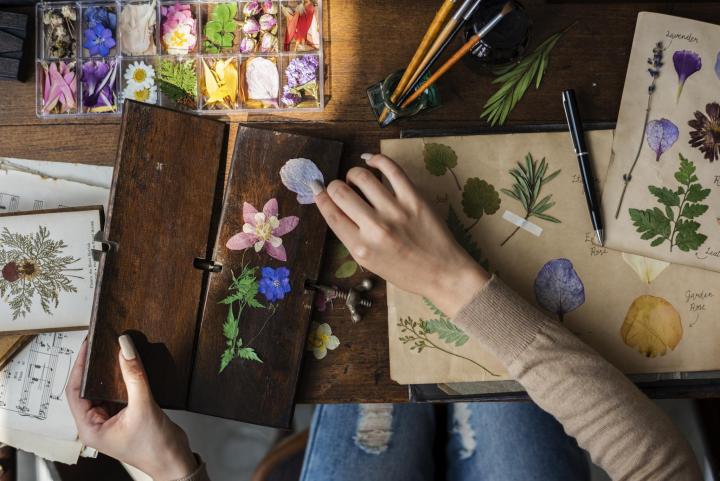
Notebook with pressed flowers.

Discover three ways to press flowers and preserve leaves. These are enjoyable activities for a quiet day—and often recall special memories and slivers of time gone by.
A Few Guidelines for Flower Pressing
- Flowers need to be as fresh as possible. Choose flowers that are either still in bud form or that are freshly bloomed.
- Pick flowers, grasses, and ferns in the late morning, right after the dew has evaporated. They need to be dry, not dewy.
- If you can’t press the flowers right away, place them in a ziplock bag and store them in the refrigerator.
- Remove lower leaves. Cut stems at an angle under water and put flowers in a clean vase out of direct sunlight.
Which Flowers Are Best for Pressing?
- Delicate flowers and flowers with naturally flat faces are best. My favorites are cosmos, poppies, and sweet peas.
- Avoid flowers with complex petals and thick stems. Roses, peonies, and daffodils are best avoided, as are white flowers, which turn brown easily.
- If you do wish to press a rose or a more complex flower, split it down the middle with scissors or a knife.
How to Press Flowers
Here are three common ways to press flowers.
1. Pressing With a Book
Pressing flowers in a very heavy book is the easiest method. It’s best to pick a book that isn’t too dear to you, as the pages may get damp.
We’d also recommend “blotting paper” to draw out moisture. (If you don’t have blotting paper, use plain facial tissue or even non-corrugated coffee filters; however, avoid paper towels, which may leave marks.)
- Arrange your finds flat between sheets of smooth blotting paper. Position as you wish. Leave space between multiple flowers.
- If you have a press, screw it tight, and write down the date. If you don’t have a press, weigh flowers down with heavy books or bricks.
- Leave undisturbed in a warm, dry place for at least four weeks (possibly less) until the paper and the flowers are perfectly dry.
- Check on flowers weekly and change blotter paper until the paper and flowers are dry.
- Using tweezers, gently move the delicate dried flowers from the paper to mount on a card, and affix them carefully with a little diluted white glue, especially the sturdier parts (stem, leaves, buds).
- You may want to spray the finished arrangement with a clear acrylic spray or, if you put the flowers on a box, use clear varnish.
2. Pressing With an Iron
If you want to press flowers more quickly, try using an iron. Arrange your flowers between the pages of a book as above.
Heat an iron on low. (Ensure there is no water in the steamer.) Then, press the iron on top of the upper sheet of paper for 10 seconds. Do not move the iron back and forth—just press down. Check the flower and repeat if it has not dried.
3. Pressing With a Flower Press
If you find that you really enjoy pressing flowers, make your own flower press! Use two pieces of wood with holes drilled in each corner. Assemble the press by placing flowers and blotting paper between the boards, then slide a bolt up through each corner. Use wing nuts with washers to tighten the two boards together. Change the blotter sheets every four days or so (this helps prevent browning), and the flower will need to be pressed for at least four weeks. Once you’ve learned how to press flowers, you can also create arrangements of flowers for your own greeting cards, framed art, or invitations. Imagine opening up a card to find a beautiful, real flower placed inside. See the instructions below.
How to Make a DIY Flower Press
A flower press is a fun activity and a great gift for a friend. You can make one out of odds and ends from around the house!
1. First, cut out two pieces of board, the same size as the end pieces. We chose the 12x9-inch dimension as a nice portable size.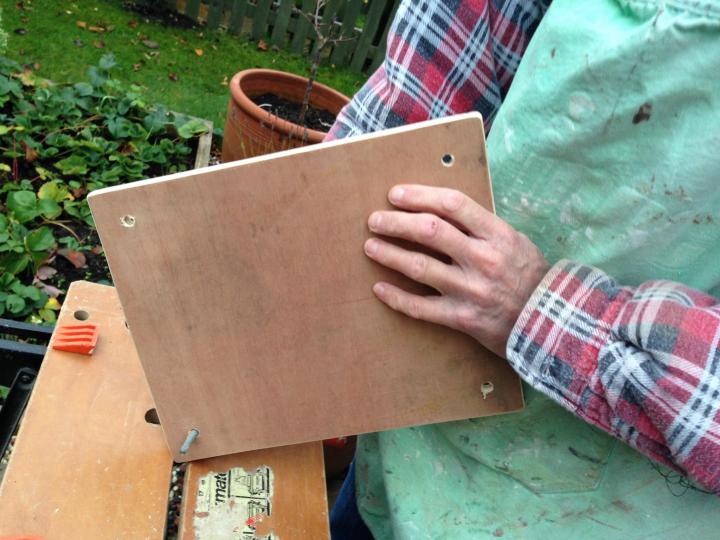
2. With a pen, carefully mark four points in the corners where you are going to drill the holes for the screws to clamp the press together. (Drill the first set of holes, and then position the second piece of board underneath the one with the holes to make absolutely sure that they match.)
3. Paint the end boards with leftover paint or a match pot.
4. Find some attractive floral designs and snip them out very carefully. I am afraid I got rather too much enjoyment cutting up this year’s very beautiful Almanac calendar and kept the lovely designs! Gift wrap, magazines, or wallpaper are other good sources of nice potential cutouts.
5. Once you have cut the designs out, glue them to the end boards with PVA glue.
6. When this has dried, varnish over the stuck-down cutouts several times, leaving the required time to dry in between times. I use about 3 to 5 coats of varnish usually, and this gives the effect of a lovely lacquer and makes the cutouts look painted and glossy.
7. Then turn your attention to the inside of the press. Cut two layers of thick cardboard and two of old wallpaper, measure where the screws will go, and carefully cut out the holes.
8. Assembly time. When the end boards are dry, put one on the bottom with the varnished design facing outwards and put the screws in each corner. Next, add one of your cardboard layers, then the wallpaper pieces, then the cardboard, and finally the top-end board, and screw the lot together.
9. We used long screws, as sometimes it is good to cut a few more pieces of card and wallpaper and press more at one go.
10. Then find your flowers, place them in between the middle wallpaper sections, assemble the press, turn your screws at the corners, and you have a great new hobby or a gift for a friend.
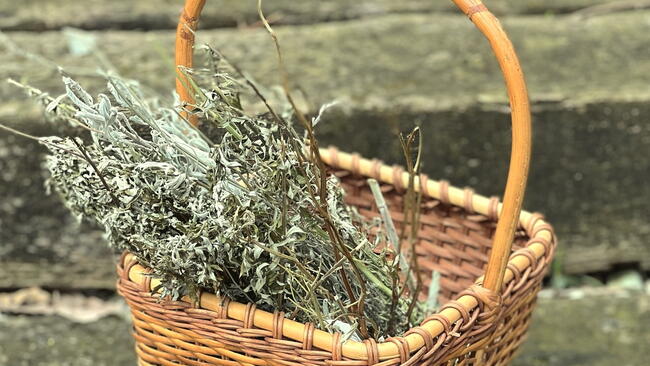
How to Preserve Leaves With Glycerin
Leaves from a flowering plant or a tree can also be preserved! Many drying methods often remove the color from beautiful leaves. To keep a strong color, the best way to dry leaves is to replace the moisture with glycerin by soaking the leaves in it. Glycerin is simply a clear liquid derived from vegetable oil.
The technique called “glycerinizing” makes leaves and stems soft and pliable, which takes about 2 to 6 days. Here’s how to do it:
- Make a mixture of one part glycerin and two parts warm water. Stir well and pour into containers so the liquid is about 4 to 5 inches deep. Glass containers are best.
- “Glycerinize” the leaves by totally submerging them in the mixture. They should be placed in a single layer and weighted to keep them beneath the liquid. After the leaves become soft and pliable, in about 2 to 6 days, they should be removed, drained, and wiped clean with a soft cloth.
- If you wish, you can glycerize an entire branch to add to a flower arrangement. Select foliage that’s about 18 inches long and split the stem end of the wood. Remove the lowest leaves. Put the stem end of the branch/branches into the glycerin/water container. As the branches absorb the mixture, add a reserve mixture of one part glycerin and four parts water to the original marked level.
Foliage color will gradually change as the glycerin is absorbed. Most branches take from one to three weeks to glycerinize.
FAQs About Pressing Flowers and Preserving Leaves
How long do pressed flowers last?
Pressed flowers can last for years if kept away from direct sunlight and moisture. Over time, some fading is natural, but storing them in frames, albums, or sealed crafts helps preserve their beauty.
Can I press flowers without blotting paper?
Yes! While blotting paper works best, you can use facial tissue, plain printer paper, or coffee filters. Avoid paper towels since their texture can leave marks.
What flowers are easiest to press?
Flat, delicate blooms like pansies, cosmos, violets, and daisies press beautifully. Avoid thick or layered flowers such as roses or peonies unless you slice them in half first.
What leaves work best with glycerin preservation?
Colorful leaves with sturdy structures—such as oak, magnolia, or maple—work very well. Ferns and small flowering stems can also be preserved with glycerin.
Can I use pressed flowers in resin or crafts?
Absolutely! Pressed flowers and glycerin-preserved leaves are perfect for resin jewelry, greeting cards, bookmarks, framed art, and even candles.
Have you pressed flowers or preserved leaves? We’d love to hear from you. Post your tips, techniques, and questions in the comments below.

Getting Started with Flower Gardening
Building a Raised Flower Bed Garden
Choosing Flowers
Types of Flower Gardens
Growing Flowers in Containers
Spring and Fall Bulbs
Caring for Flowers
More Like This


We love to hear that, Kate!
- « Previous
- 1
- 2
- …
- 10
- Next »
Comments