
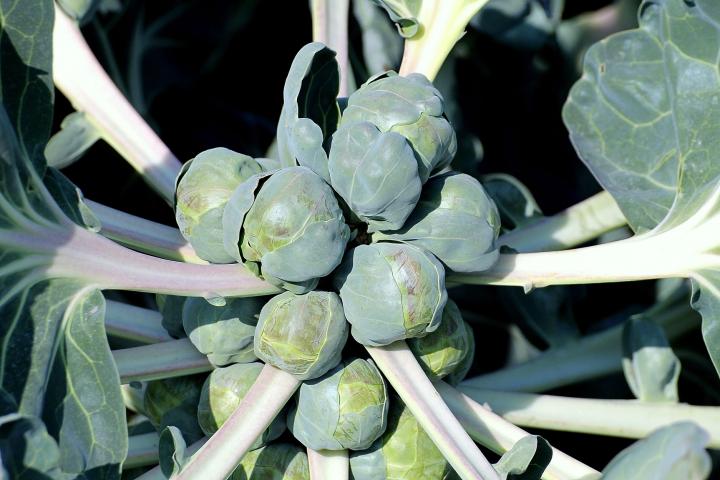
Plant, grow, and harvest Brussels sprouts for sweet, frost-kissed flavor
The Almanac Garden Planner - Use It Free for 7 Days!
Plan your 2025 garden with our award-winning Garden Planner.
Brussels sprouts: the little green globes that get a bad rap—until you grow your own! When grown right, these cool-season veggies are sweet, tender, and packed with nutrition. Best of all, they actually improve after a light frost. Whether you’re new to growing or ready to level up your fall harvest game, here’s everything you need to know about cultivating Brussels sprouts in your garden.
About Brussels Sprouts
Named for Brussels, Belgium, where they were first cultivated in the 16th century, brussels sprouts are a vegetable that is commonly seen in the grocery store, but not-as-commonly seen in the home garden. This is probably because they aren’t the easiest vegetable to grow! They require a fairly long growing season (80–100 days to harvest) and are a cool-season crop, meaning that they produce best when grown for a fall or early winter harvest. The sprouts improve in flavor after a light frost or two.
As long as you plant them at the right time, keep them cool and well-watered during the heat of summer, and protect them from pests, brussels sprouts are a rewarding vegetable crop to grow—an accomplishment!
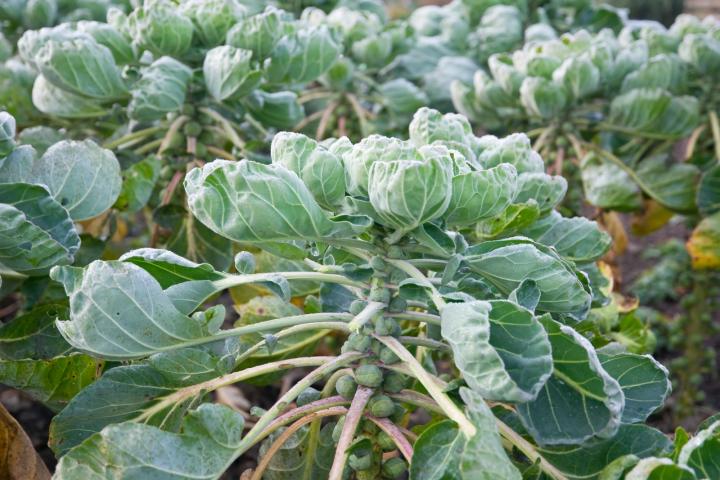
Brussels sprouts are a cultivar (cultivated variety) of wild cabbage, Brassica oleracea, which is the same plant species that cabbage, broccoli, cauliflower, kale, kohlrabi, and a number of other popular food crops stem from. Over generations and generations, this versatile plant has been bred in different ways to highlight its different features—flowers, leaves, buds, stem, and root—to provide us with a wide variety of foods! Brussels sprouts form as buds along the main stem of the plant, just above each leaf axil.
Growing
- Side-dress 2 to 4 weeks after planting or when plants are 12 inches high.
- Repeat every 3 to 4 weeks.
- Mulch to retain moisture and keep the soil temperature cool through summer.
- Keep the plants well watered. Inconsistent moisture can lead to subpar sprout development. Brussels sprouts should receive about 1 to 1½ inches of water per square foot per week.
- Consider using row covers to protect young plants from pests. Brussels sprouts are usually planted outdoors right when pests are at their worst!
- Do not disturb the soil around the plants; roots are shallow and susceptible to damage.
- Brussels sprout plants usually reach heights of 2 to 3 feet, so plan accordingly; they may require staking.
- Remove yellowing leaves at the bottom of the plant to allow for more sunlight on the stalk and to focus plant energy on healthy growth.
- To encourage the sprouts to mature faster, cut off the top leaves 3 to 4 weeks before harvest.
- Note: If you intend to harvest sprouts into winter, leave the plant’s top leaves intact; they provide protection from snow. Also, cover plants with 10 to 12 inches of mulch.

Types
- ‘Churchill’ is an early maturing plant, adaptable to most climates.
- ‘Diablo’ is known as a heavy producer.
- ‘Falstaff’ has a red/purple hue that holds when cooked
- ‘Jade Cross’ is a high-yield compact plant, resistant to some diseases and known for its tolerance for hotter weather.
- ‘Long Island Improved’ is an heirloom and a compact plant that prefers a cool summer.
- ‘Oliver’ is an early-maturing variety with a shorter growing season requirement (80–90 days).
Harvesting
- Sprouts mature from the bottom of the stalk upwards. Harvest sprouts from the bottom when they reach about 1 inch in diameter.
- If desired, after a moderate frost, pull up the entire stalk, roots and all. (Remove leaves first.) Then hang stalk upside down in a cool, dry basement or garage or barn.
- Store stalks (no roots) for about 1 month in a root cellar or basement.
How to Store Brussels Sprouts
- Do not wash the sprouts before storing them, only right before use.
- Keep fresh-picked sprouts in a plastic bag for up to 5 days in the refrigerator.
Cooking Notes
We prefer roasting sprouts—they have a lovely carmelized flavor!
Catherine Boeckmann


ADVERTISEMENT
You might want to just cut some off at the soil line (thinning out your plantings)—do not pull the plants up, as they may disturb the roots of the plants you are keeping.You could keep them all, but they likely would not yield as well as ones that have more room to grow, or be as vigorous in the long run.
HI, I live in Northern California in the Sierra Nevadas in the Tahoe National Forest area at about 2000 ft. elevation. I planted a dozen brussel sprouts as starts that I bought back in late Sept/ early Oct. 2016 and they have been slow to get going through the very rainy, cold winter season. I fed the soil with Borax (Boron) which I diluted a tablespoon of the powder with a gallon of water when I first planted them. I mixed dried chicken manure with the soil and covered the soil around them with straw. Some of the plants leaves have turned red or yellow at the bottom of the stalks and then about half of them just started to bolt and flower before they had a chance to get tall enough to start growing sprouts. What could I have done wrong or what could I have done or do differently? Please help.
Sometimes young brussels sprout plants will bolt if they are exposed to cold temperatures over a few weeks, such as below 40F. To avoid this, you can select slow-bolting types, or plant when the weather is warmer. You might also have your soil tested to see if it has too little, or too much, of a needed nutrient. Hope this helps!
I planted my brussel sprouts seeds in September of last year (ideal planting time for my area per the low desert planting guide). The plants sprouted within 4 days and grew throughout the winter (we had a wet but mild winter). It's been 5 1/2 months, the leaves are green and hearty, however, there is still no stalk growing. Given the length of time it's been, do you think there is a chance we will get sprouts this spring? It's going to be getting hot here soon (up in the 80s this week). :-)
This is a puzzle, Suzanne. Do you mean there is no stalk? Or there are no sprouts on the stem? Brussels sprouts like—no, love—rich, composted soil that contains aged cow manure. While we can not be certain that’s what has stunted the plants’ growth, soil is the source of many problems. Spread some compost/manure soil mix around, and scratch the soil a bit to “open” it (be careful not to disrupt roots). Then water as needed to soak the soil mix so it will soak into the ground.
While these plants prefer cooler conditions, we grow them here in New Hampshire through some pretty hot spells, so you may be ok. Let us know how it goes.
I stubbornly planted my brussel sprouts this past May (in Portland, Oregon) where I should have planted them in February. As such, of the two plants I grew from seed, one survived. Said plant grew very slowly and resiliently through Summer, then Fall and on through this Winter. It is now a modest 6" tall, never produced more than a few leaves and has more life than ever, with the cold upon us.
My question is: Is my plant going to produce sprouts this year, even though I started it last year?
I’m not sure if your plant will produce sprouts. It has certainly been a trouper, though! The shorter days may have something to do with its very slow growth. Perhaps it might perk up toward springtime, provided that temperatures do not dip much below 20F in the meantime, and other environmental conditions are optimum. Normal planting time for fall/winter harvest in your area is about August, for November through January harvest, depending on cultivar, timing, etc. Keep an eye out for signs of bolting (which can happen in late winter for summer-planted sprouts).
This my first year growing brussel sprouts, my plants are about 4 feet high with lots of little sprouts on them. I saw a video that said to trim the bottom big leaves off, which I did. Now I just don't know when I can harvest them. Also I heard they will come up again next year is that true.
You can harvest the brussels sprouts when they are between 1 and 2 inches in diameter and still firm - do not wait until leaves yellow. The sprouts on the lower part of the plant will mature first. Brussels sprouts are biennials, meaning that they will flower and set seed the next year and then the plants will die. Most gardeners treat this crop as an annual, unless they are saving seed the second year.
Brussels sprouts
after the plants get growing and the sprouts start to develop I have been told to remove the leaves so the sprouts will develop, is this true? I have tried to grow these before with no luck, The sprouts start to develop but never look like store bought, no small heads, just leaves....