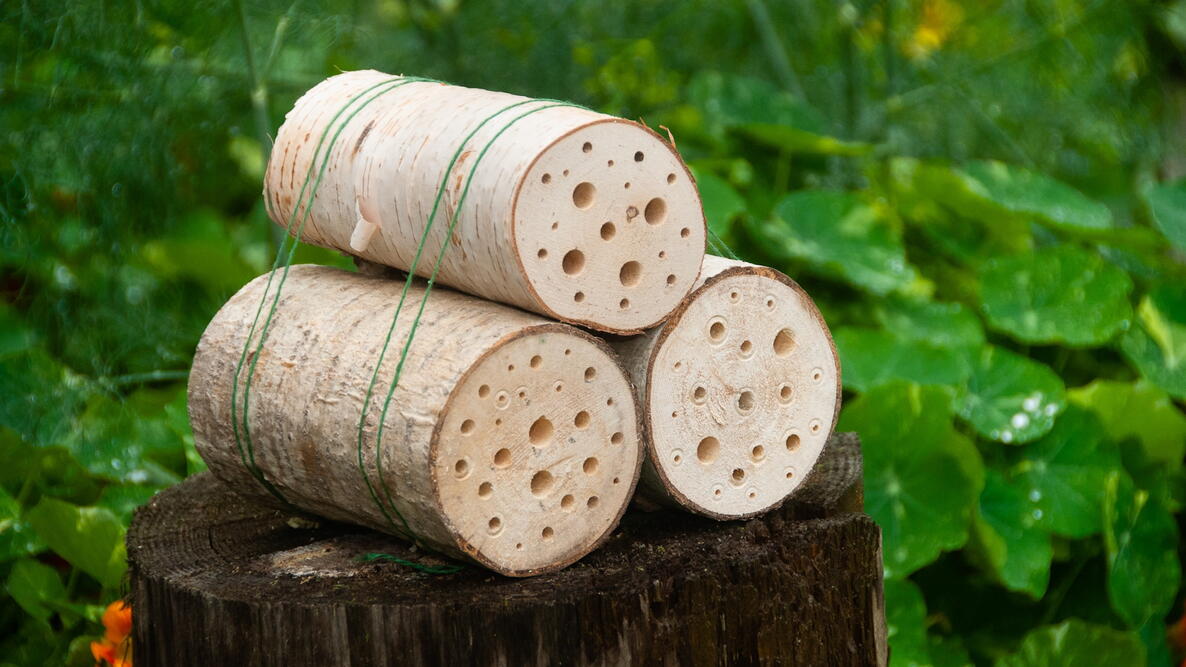

Build a cozy home for some of the garden’s smallest helpers! This easy DIY bug hotel uses small logs with holes where solitary bees and helpful wasps can nest. It takes about an hour to make and requires only a few basic tools. Place it carefully and keep it clean, and your tiny guests will feel right at home. Let’s get building!
Project at a Glance
- Project time: 1 hour
- Skill level: Beginner
- Cost: Free (if using supplies and wood you have on hand)
- Best for: A dry, sheltered spot near flowers or vegetables
- Lifespan: 1 to 3 years for unlined logs

Materials & Tools Needed
- A few small logs or thick branches of untreated wood, about 3 to 4 inches in diameter and 6 inches long
- Cordless drill
- A small set of assorted wood drill bits, including sizes from 3/32 to 1/2 inch (sets of bits are commonly found at home improvement retailers)
- Hand saw or pruning saw
- Twine
- Parchment paper (optional)
- Safety glasses
- Scrap wood or heavy wood blocks to keep the logs from rolling (or, a vise or clamps if on hand)
- A flat piece of scrap wood and extra twine for a roof (optional)
- Paint and a small brush (optional)
Building a DIY Bug Hotel
Step 1: Select Your Mini Logs
The word “logs” may give the wrong impression, since they’re only about 3½ inches in diameter! We’ll call them mini logs.
You can use small saplings or thick branches left from pruning or windfall. Choose natural wood that has not been painted, stained, pressure-treated, or treated with chemicals.
We selected beautiful quaking aspen with smooth gray bark and one paper birch mini log.

Step 2: Cut Your Mini Logs
Before cutting, secure the log so that it cannot roll. Use a vise or clamps if you have them. If not, rest it in a simple V-shaped cradle made from scrap wood or wedge it firmly between heavy wood blocks. Keep your hands safely away from the saw.
Use a hand saw or pruning saw to cut each mini log about 6 inches long. Because the branches are only a few inches thick, no power saw is needed.
Take your time and let the saw do the work.

Step 3: Drill the Holes
This is the step where you transform the mini logs into nesting places for insects.
You’ll need several wood drill bits in different sizes. These are the removable metal pieces that fit into the front of the drill and make the holes. You can buy a small assorted set at a hardware or home improvement store. The size is usually marked on each bit or on the package.
Keep the log secured as described in Step 2 so that it cannot roll. Never hold it in your hand while drilling.
Choose a drill bit, fit it into the cordless drill, and drill straight into one cut end of the log. Use several sizes, from tiny 3/32-inch holes to larger 1/2-inch holes. Make the smaller holes about 2 to 3 inches deep and the larger holes about 5 inches deep. Be careful not to drill all the way through the log.
Work slowly, lifting the drill bit out occasionally to clear away sawdust. Then switch to another size and repeat.

Step 4: Tie the Logs Together
Arrange three mini logs in a small pyramid, with all the holes facing the same direction.
Wrap the twine a couple of times around the bundle and tie it tightly. Give the bundle a gentle shake. If the logs shift, tighten the twine or add a second tie near the other end.
At this stage, you can also paint a dash of color around the openings of some of the holes; the different markings may even help bees find their own “room.” Just keep paint out of the holes and let it dry completely.

Step 5: Place the Finished Bug Hotel
Set the finished bug hotel on a flat, stable surface where it will not tip or roll. Face the openings east or southeast so they receive the morning sun. If the hotel feels wobbly or is exposed to strong wind, secure it with an extra length of twine.
Place it near flowers or vegetables that need pollinating. Mason bees may also appreciate a small patch of damp, bare soil nearby for gathering mud to build their nests.
Choose a sheltered spot where the nesting holes will stay dry, such as beneath the edge of a porch, shed, or other small roof. If no shelter is available, lay a flat piece of scrap wood across the top and tie it securely in place. Let it extend a few inches beyond the openings so rain drips in front of them instead of running inside.

Step 6: Care for Your Bug Hotel
Like any hotel, this one needs a little housekeeping! Drilled logs are difficult to clean, and old nesting holes can eventually harbor mold, mites, and parasites.
Before the hotel is occupied, some bee innkeepers roll parchment paper into snug-fitting tubes and slide them inside the holes. After the bees have emerged, pull out the used tubes and replace them with fresh ones.
Replace or retire unlined logs every one to three years.
Frequently Asked Questions
What Kind of Insects Will Use This Type of Bug Hotel?
Depending on where you live, your guests may include mason bees—such as blue orchard bees—leafcutter bees, yellow-faced bees, small carpenter bees, and helpful solitary wasps.
Should I Add Hardware Cloth Around My Bug Hotel?
It isn’t necessary, but hardware cloth can help protect the hotel if birds or rodents become a problem. Place it a couple of inches in front of the holes so bees can still come and go.
Winter Is Coming, Should I Bring My Bee Hotel Indoors?
Keep occupied nests cold and dry over winter. You may move the hotel to an unheated shed, garage, or sheltered outdoor location after nesting activity has ended. Never bring it into a heated home, where warmth could cause the bees to emerge too early.





Comments