
It’s easy to make life more complicated than it needs to be, isn’t it? In the garden, simple often works just as well. Instead of buying a trellis, you can build a sturdy bean teepee with just a few poles and some twine—often for little or no cost.
Here’s how to build an inexpensive, rustic support for pole beans, peas, cucumbers, and other climbing vegetables.
Bean Teepee at a Glance
- Project time: 30–60 minutes
- Skill level: Beginner
- Cost: Under $20 (or nearly free if using saplings)
- Best for: Pole beans, peas, cucumbers, and other climbing vegetables
- Lifespan: Multiple growing seasons with proper storage
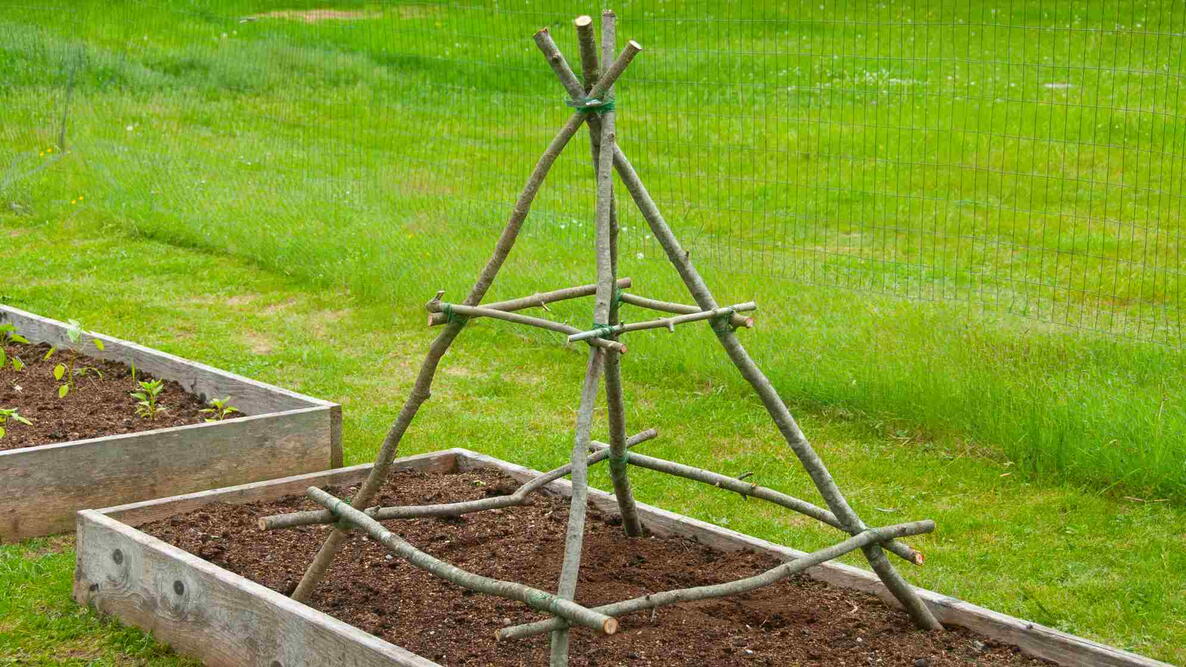
Author’s Note: We built the bean teepee shown here using ash saplings harvested on our property, but bamboo poles or dimensional lumber work just as well. These photos document the entire process.
Why Build a Teepee?
This is a very easy way to support climbing vegetables while making better use of your garden space. Growing vertically improves air circulation, keeps vegetables cleaner, makes harvesting easier, and creates an attractive focal point in the garden.
Pole beans are especially well suited to this style of support because they naturally twine around the poles as they grow. Peas and cucumbers also climb well, particularly if you add a little extra twine between the poles for additional gripping surfaces.
Looking for another option? Our “A-frame Trellis” provides climbing space on two sides and works especially well for cucumbers, squash, and sprawling vines. A bean teepee takes up less room, making it a great choice for pole beans and peas.
How to Build a Bean Teepee
We designed this project to require very little DIY know-how, making it approachable for almost any gardener. Feel free to substitute materials you already have and adjust the dimensions to fit your garden and available space.
The instructional photos throughout this project were provided by Daniel Johnson.
Supplies Needed
Safety Note: Always use caution when working with hand or power tools, wear appropriate safety gear, and follow the manufacturer’s instructions.
Tools
- Hand saw (or loppers for faster cutting)
- Hand pruners
- Scissors
- Tape measure
- Large pipe clamp and screwdriver (optional)
- T-post driver (optional)
Materials
- Twine
- Four 60-inch (5-foot) poles
- Four 40-inch poles
- Four 20-inch poles
- Metal T-post (optional)
Step 1: Choose Your Poles
The poles are the foundation of the entire teepee, and there are several inexpensive ways to source them. Bamboo poles are lightweight, inexpensive, and sold at most garden centers specifically for DIY garden projects. You could also use thin lumber such as 1x1s if you have some on hand.

In the spirit of creating a rustic, self-sufficient project, we sourced our poles directly from a wooded area on our property. We used loppers to harvest small ash saplings about 1 to 2 inches in diameter. Because these trees were growing densely beneath mature trees, thinning them made good use of wood that otherwise had little chance to thrive.
If you use saplings, trim away small branches with hand pruners. They won’t be perfectly straight, but that’s part of the charm—and once everything is lashed together, the finished frame becomes surprisingly sturdy.

Step 2: Cut the Poles to Size
Regardless of the material you choose, cut the poles into a few uniform lengths. You can adjust these dimensions to fit your garden space, but to construct the size shown in these photos, you’ll need four long poles cut to 60 inches (5 feet).

If you’re using saplings, reserve the thickest sections for the four main supports. Use thinner sections of wood for the additional four 40-inch pieces and the four small 20-inch pieces.

Remember, too, that this is a rustic teepee and exact precision isn’t necessary. Just get your poles to approximately the right lengths.

Step 3: Assemble the Frame
Select the four long 60-inch poles and arrange them into a teepee shape. This requires just a bit of trial and error as you experiment with how far apart the feet should be.

Tip: Don’t worry if the four legs aren’t perfectly symmetrical. Once the horizontal braces are attached, the frame becomes much more rigid and any minor wobble disappears.
Position the feet roughly 3 to 4 feet apart while allowing the tops to overlap. Don’t bring all the poles together into a single point at the top—let them criss-cross each other a bit, so that there is a good 6 inches of crossover at the top.

Use a large pipe clamp to temporarily hold the poles together while you work. If you don’t have one, simply lash the poles together with twine.

Step 4: Install the Lower Cross Braces
With the four main poles standing on their own, begin attaching the four 40-inch cross braces around the lower half of the frame. Position each brace where it naturally fits—there’s no need to make every measurement perfect.

Use twine to lash each brace securely to the vertical poles. Wrap the twine several times in different directions before tying it off to keep the brace from shifting.

Repeat the process on the remaining three sides until all four lower cross braces are installed.

Step 5: Add the Upper Cross Braces
Next, attach the four shorter 20-inch cross braces higher on the frame, placing them where they naturally fit. Lash each one securely with twine.

At this point, your bean teepee is essentially complete. If you’re growing cucumbers or other plants that need extra support, weave additional twine between the poles to create more places for vines to grab.

Step 6: Anchor the Teepee
Push the legs several inches into the soil before planting. Even then, a strong wind—especially later in the season when mature bean vines become heavy—can tip the structure.
A simple metal T-post makes an excellent anchor. Fasten the teepee to it using twine or zip ties for extra stability.
Plant Your Pole Beans
Ta-da! Your DIY bean teepee is ready for planting.
Sow pole bean seeds around the base of each pole according to the seed packet directions.

As the seedlings grow, they’ll naturally begin twining around the supports. If needed, gently guide young vines onto the poles during the first week or two until they begin climbing on their own.

Pole beans naturally twine around the poles as they grow, creating an attractive vertical feature while making harvesting easier. This simple support also works well for peas, cucumbers, and other climbing vegetables.
Store the teepee in a dry place over winter, and it will serve your garden for many growing seasons.
Frequently Asked Questions
How tall should a bean teepee be?
A 5-foot teepee works well for many home gardens, although vigorous pole bean varieties may benefit from poles that are 6 to 8 feet tall.
Can I use bamboo instead of wooden saplings?
Yes. Bamboo poles are lightweight, inexpensive, durable, and widely available at garden centers.
How many bean plants fit around one teepee?
Most gardeners plant one or two bean seeds around each pole, depending on the variety and available space.
Can cucumbers grow on a teepee?
Absolutely. Cucumbers climb well on this structure, especially if you add a little extra twine between the poles. As discussed above, you can also explore an A-Frame trellis.
How long will a homemade bean teepee last?
With durable poles and proper winter storage, a homemade bean teepee can last for several growing seasons. Simply remove the dead vines at the end of the season and store the teepee in a dry, protected location until spring.


Comments