Caption
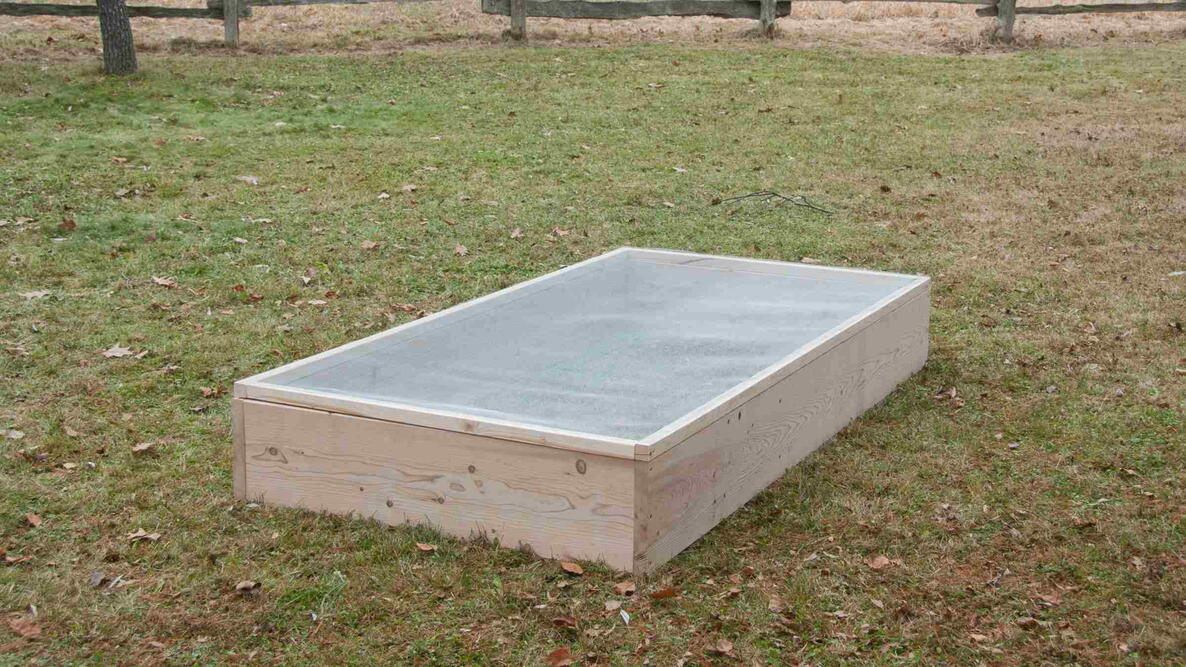
Finished and ready! Build your own raised garden bed in under an hour.

I’m a big believer in raised garden beds—they’ve made my gardening easier, tidier, and honestly more enjoyable. In this guide, I’ll show you step-by-step how to build a budget-friendly DIY raised garden bed in less than an hour, complete with a simple protective frame.
Raised beds are versatile: they add structure to your garden, make mowing and trimming easier, and even turn weeding into a manageable task. (I often tell myself, “I’ll just weed this one bed for 30 minutes,” and suddenly it feels doable instead of overwhelming.) You can also tailor the soil in each bed, and keeping track of crop rotations becomes as simple as sketching a quick map.
Of course, pre-made raised beds can be pricey. But with just a few tools, some lumber, and this step-by-step plan, you can build one yourself at a fraction of the cost.
About This Raised Garden Bed Design
This raised bed is a 4×8-foot rectangle, with a lightweight 4×8-foot frame on top made of small 2x2s. Raised garden bed styles vary, but for this project, we’re keeping it simple and budget-friendly.
This bed is made of inexpensive lumber and can be built from start to finish in under an hour. It’s straightforward enough that you could set up a DIY assembly line and make several in a weekend—or just start with one. Though, trust me, you’ll likely end up building more! (If you do, check out our tips for designing your garden layout.)
You can also adjust the bed width to fit your space. Some gardeners prefer a slightly narrower bed, like 3 feet instead of 4, which makes it easier to reach the center. This adjustment is simple and doesn’t affect the rest of the build—or, you can stick with the standard 4×8-foot size.
Optional: Add a Mesh Cover
Bonus! Add a frame with a mesh cover to protect crops! The best type is called “hardware cloth” because it keeps the critters out and is much more durable than chicken wire or other screen mesh.
This is a simple yet ingenious way to protect your raised bed from squirrels, cabbage moths, and other pests, especially when your seeds and seedlings are growing.
If you don’t need this level of protection, you could also just wrap your beds in screen mesh and use a DIY cover that you roll over the beds (like the strawberry bed below).

Tools & Materials You’ll Need
This is a straightforward carpentry project, but you’ll need some basic tools and safety awareness.
Tools:
- Electric drill (or a hammer)
- Circular saw
- Tape measure
- Framing square (optional)
- Staple gun
- Tin snips
- Safety glasses
- Gloves
Tip: Always use caution with power tools. Read manuals, wear safety gear, and work carefully. DIY projects can be rewarding but should always prioritize safety.
Materials
- 3-inch exterior screws (or 3-inch galvanized nails)
- A 4×8-foot section of mesh screen (called hardware cloth) with ½-inch holes.
- ½-inch staples
- Optional: Three hinges for the screen frame
Lumber Cut List
Note: When you purchase lumber, you simply buy three 8’ 2x12s and cut one of them in half to create the two 45” pieces.
- 2 x 96” (8 feet) 2x12s (long sides)
- 2 x 45” 2x12s (short ends—cut from the 3rd 8’ board)
- 2 x 96” (8 feet) 2x2s (frame)
- 2 x 45” 2x2s (frame ends)
Step-by-Step Instructions for Building a Raised Garden Bed
Building a raised bed may sound intimidating, but it’s easier than it looks. Follow these six steps:
Step 1: Cut the Lumber
- The two long sides of the bed are made from a pair of 8’ 2x12s. You can purchase lumber sold as 8’, but if you actually measure it, you’ll likely find it’s an inch or so longer than 8 feet (though not always).
Double-check your lengths before cutting. The old adage is, “Measure twice, cut once.” In other words, it’s easier to trim excess than fix a short board. You can trim away any excess with a circular or hand saw.

You’ll also need two 45” pieces for the short sides; both of these can be cut from a single 8’ board. Cut the 2x2 pieces in the same fashion for the top frame.

Step 2: Lay Out the Bed
This project doesn’t require a lot of precision so that you can build it outside on any reasonably flat piece of ground. Assembling it on a concrete floor in a garage can make it easier to keep everything straight.
- To lay out the design, simply place the two 8’ 2x12s on the ground, parallel to each other. The two 45” 2x12s form the short ends of the bed and are placed on the inside of the long sides.

Step 3: Connect the Corners
- Now, carefully drill pilot holes, then secure corners with 3” screws (or, alternatively, use a hammer and nails).
- A framing square helps keep corners square, but slight imperfections won’t affect plant growth.

![Corner drilled, ready for screws]](https://www.almanac.com/sites/default/files/Drill-wood-D-Johnson.jpg)


Step 4: Build the Screen’s Frame (Optional)
If you wish, add a screen frame. The frame for the screen cover is constructed the same way as the bed itself, just with 2x2s instead.
- Lay out the 2x2s in the same rectangle pattern.
- Pre-drill and screw the corners together to make a lightweight frame. You can nail these as well, but it’s tricky because of the size of the lumber. At the very least, if you choose to use a hammer and nails, drill pilot holes for your nails to prevent splitting the 2x2s.

Place your finished frame on top of the raised bed to check the fit.


Step 5: Attach the Mesh Screen
Wear gloves and safety glasses for this next step!
- Carefully roll out your mesh screen. Position the corner over the top of the 2x2 wooden frame and staple it into place with a staple gun.

- Slowly staple down the mesh screen, keeping a tight grip to prevent sagging or “bubbles.”

- Using tin snips, cut off any excess mesh cloth that is hanging over the edge.

The frame is light enough to lift on and off. Once flowering crops need pollinators, the screens can be easily removed.

Using Your Raised Garden Bed
Now the fun begins! (Okay, building the bed was fun in its own way, but it’s going to be even more fun to start gardening.)
- Pick the right spot. Level ground in full sun (6 to 8 hours/day) works best, though partial shade can suit lettuces and other greens. Keep in mind that you’ll be rotating crops as the seasons pass, so beds placed in full sun tend to be more useful.
- Consider water access. Keep the bed near a hose or spigot— daily watering is much easier. The University of New Hampshire points out that placing your raised bed near your home makes it easier to water the plants.
- Fill with quality soil. Mix garden soil, compost, and organic matter. Raised beds let you control soil quality from the start.
See the Almanac’s article on best soil for a raised bed. - Plant your crops. Vegetables, herbs, strawberries, or flowers all thrive here. Beginners can start with forgiving crops like lettuce, beans, or basil. See our guide on what to plant in raised beds.
- Watch the water. Raised beds tend to dry out a little faster than in-ground gardens, especially in the first few weeks. Check soil moisture daily until you understand your bed’s needs.
FAQ: DIY Raised Garden Beds
Q. How deep should a raised bed be?
A. Most vegetables do well in 12–18 inches of soil. Root crops like carrots or potatoes benefit from 18–24 inches.
Q. What’s the best soil mix?
A. A balanced mix is one-third compost, one-third garden soil, and one-third peat moss or coconut coir.
Q. Use a mix of topsoil, compost, and organic matter. A common blend is 60% topsoil, 30% compost, and 10% potting soil or coconut coir for moisture retention.
Q: Do I need a bottom for a raised bed?
A: No. A bottomless raised bed lets plant roots reach nutrients and water in the soil below, promoting deeper growth. It also improves drainage.
Q. Can I build a raised bed without tools?
Yes, no-tool kits exist, but DIY with a circular saw and drill is cheaper, sturdier, and customizable.

Comments