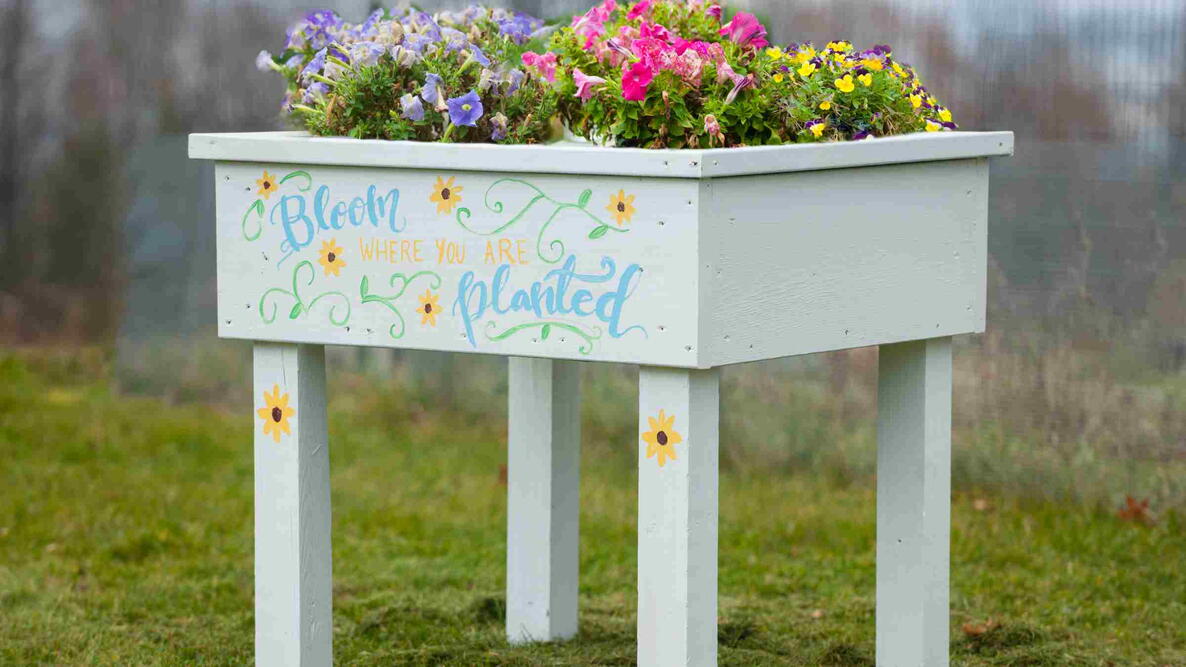
Caption
Gardening doesn’t have to be back-breaking—this DIY elevated bed brings blooms to waist height.

A moment of honesty here: Gardening can wreak havoc on your back. A DIY elevated garden bed—also called an elevated raised bed or standing garden bed—lets you garden at waist height, making planting, weeding, and harvesting easier. Follow this guide for step-by-step instructions, a supply checklist, and a lumber cut list to build your own elevated bed and enjoy more comfortable, back-friendly gardening.
Making an Elevated Garden Bed
An elevated garden bed is essentially a raised planter box with legs, designed to bring gardening up to waist height. Unlike traditional raised beds that sit on the ground, these beds stand like tables—making them ideal for gardeners who want to reduce bending, kneeling, or strain. It literally takes the concept of a raised bed to the next level.
Not only does a table-height raised bed make the basic work easier on your back, but an elevated garden bed can also help deter nuisance critters and pests from finding your plants. It may also even help keep your food crops cleaner and help prevent ground-based insect damage. Some garden crops like lettuce or kale can especially benefit from an elevated bed, but you could also grow peppers, tomatoes, bush beans, many types of herbs, and even flowers.
For all those reasons, I would use elevated garden beds even without the fact that it’s easier. And you’ll be glad to know that it’s a relatively straightforward DIY project that you can tackle with some basic skills and tools.
Tools and Supplies You’ll Need
Building an elevated raised bed is straightforward—you’ll only need common tools and lumber sizes available at most hardware stores. The design is basic enough that you could enlarge it slightly if you wanted a bigger growing space. For instance, you could keep the 3-foot width but expand the length to 4 or 5 feet long without introducing significant changes to the design.
- Pencil
- Tape measure
- Square
- Staple gun and staples
- Paintbrush
- Cordless drill (alternatively, a hammer)
- Circular saw
- Miter saw to make cutting angles easier (optional)
Tip: Always use caution with power tools. Read manuals, wear safety gear, and work carefully. DIY projects can be rewarding but should always prioritize safety.
Materials
- 3-inch exterior screws (alternatively, 3-inch galvanized nails)
- A 36x36-inch square of landscape fabric/weed mat
- Exterior paint of any color (your choice! Mine is white)
Lumber Cut List
- 2 — 36” 2x12s
- 2 — 33” 2x12s
- 4 — 36” 4x4s (legs)
- 4 — 38” 2x4s
- 3 — 33” 2x4s
- 2 — 26” 2x4s
Step-by-Step Instructions for Building an Elevated Garden Bed
The overall shape of the elevated bed is 36” x 36”.
Step 1: Build the Bed Frame
We start by building a 36x36-inch square out of 2x12s. Two sides of the square are made from two 36-inch 2x12s, while the opposite two sides are made from 33-inch 2x12s.
- Place the 33-inch boards inside the 36-inch boards for a perfect square.
- Fasten the corners with 3-inch screws (or nails).
(Note for all steps: you can use a hammer and 3-inch nails on this project and achieve the same results. But a cordless drill and screws definitely make it easier!)

Step 2: Attach the Legs
All four legs are identical 4x4s, 36 inches long.
- Turn the frame upside down.
- Attach one 36-inch 4x4 leg in each corner.
- Take care to get each 4x4 flush with the top edge (with the top being upside down on the ground right now).
- Secure firmly with 3-inch screws, tightening the legs to the square.
- Then flip the elevated bed right-side up. (It will be getting a bit heavy at this stage).


Step 3. Cut the Trim Pieces
We use four 38-inch 2x4s as the trim on the top of the bed.
- Cut the four 2x4s to 45° angles at both ends (as shown in the photos below). A miter saw does this job very quickly and precisely, but you can use a basic circular saw as well.
- Arrange the pieces to form a square frame. Try to make all of your corner joints as tight as possible.
- Fasten them with 3-inch screws. If any of your angled cuts are off, you can always cut new ones, or you can just embrace any imperfections as rustic charm! (That’s what I recommend, anyway!)


Step 4. Add the Trim
Now you can place the frame of trim pieces on the top of the bed! Secure with 3-inch screws. This gives your bed a clean, finished look.

Step 5. Install Floor Supports
We’re going to use a piece of landscape fabric for the floor of the elevated bed, as recommended by Iowa State University. The fabric will hold the soil in but still allow moisture to escape. To help support the landscape fabric, we’ll use a series of 2x4s, spaced roughly evenly.
- Add three 33-inch 2x4s across the bottom as the middle supports.
- Place two shorter 26-inch 2x4s are used on the ends between the legs (since they have to fit between the 4x4 posts). Spacing doesn’t have to be exact (they’ll be hidden from view), so just “eyeball” it to roughly match the photo (if you want to be exact, the spacing is 3⅞ inches).
- Attach all with 3-inch screws.

Step 6. Add Landscape Fabric
Next, staple a 36x36-inch piece of landscape fabric over the floor supports. This will hold soil while allowing water drainage. Use your staple gun along with an ample supply of staples to fasten it into place.

Step 7. Paint, Fill, and Enjoy!
Painting or sealing the wood of your elevated raised bed will protect it from the elements. Add your own creative touch! Once dry, fill with soil and start planting.


Using Your Elevated Garden Bed
- Place your elevated bed in full Sun or partial shade, depending on the needs of the plants you’re growing. See our guide on what to plant in raised beds.
- Unlike a typical raised bed, this one is small enough that you can move between seasons if needed. To lighten the weight, consider emptying some soil first or adding wheels.
- Grow herbs, greens, flowers, or compact vegetables with ease.
Gardening while standing makes it easier to see and tend your plants—so don’t be surprised if you end up building more than one bed!
Tips for Soil, Drainage, and Planting Success
- Use a lightweight raised bed soil mix to prevent excess weight.
- Mix in compost for nutrients.
- Line the bottom with fabric only (no solid wood floor) so water drains properly.
- Water regularly, as elevated beds can dry out faster than ground-level gardens.
—>For more detailed soil advice, read: Choosing the Best Soil for Raised Garden Beds.
—>And if you’re wondering how much soil to buy, use our handy Soil Calculator.
FAQ
Q. What kind of wood should I use for an elevated garden bed?
A. Use rot-resistant, untreated wood like cedar or redwood. Avoid pressure-treated lumber for food crops.
Q. How deep should an elevated raised bed be?
A. At least 10–12 inches of soil depth is ideal for most vegetables and herbs.
Q. Do I need drainage in an elevated garden bed?
A. Yes—landscape fabric allows water to drain while keeping soil in place. Never seal the bottom completely.
Q. Can I add wheels to my elevated raised bed?
A. Yes—casters rated for heavy loads make the bed mobile, as suggested by the North Carolina State Extension.
Photos by Daniel Johnson.

Comments