
Who knew an old pair of gloves could turn into a turkey? This simple DIY craft is fun for kids (and kids at heart!) and makes a cheerful addition to your Thanksgiving table. With just a few colorful gloves, some stuffing, and a little creativity, you can create your own glove turkey that doubles as a festive centerpiece. Get ready for smiles, laughter, and maybe even a new holiday tradition!
Why Make a Glove Turkey for Thanksgiving?
Thanksgiving is about more than just food—it’s about fun, family, and creating memories together. Making a glove turkey is a lighthearted craft that brings kids (and adults!) into the holiday spirit. It’s simple, inexpensive, and lets little hands get creative while waiting for the big meal. Plus, the finished turkey makes a charming decoration or centerpiece that adds a touch of homemade joy to your table.
Supplies You’ll Need
- 3 small stretch-knit gloves (yellow, orange, or red, and brown)
- Polyester fill (stuffing)
- Needle and thread (or fabric glue for a no-sew option)
- Felt (for beak, hat, vest, and tie)
- mall buttons (for eyes)
- Scissors
- Hot glue gun or fabric glue
- Decorative extras (leaves, moss, dried flowers, or a plate for display)
Step-by-Step Instructions for Making a Glove Turkey
- Gather supplies. Lay everything out so it’s handy.
- Prep the “feather” gloves (yellow + orange/red):
- Stuff each finger and the palm with polyester fill so the fingers puff up like feathers.
- When full, push extra stuffing down into the cuff and close the cuff end.
- Sewing: whipstitch or backstitch across the cuff and knot securely.
- No-sew: twist the cuff, tie tightly with a strong thread or a rubber band, then cover with a dab of fabric glue.
- Make the body (brown glove):
- Stuff the brown glove more firmly, adding a little extra in the palm area for a rounded “stomach.”
- For stability, add a small sealed pouch of rice/beans or a handful of pebbles into the base of the glove before closing (this helps the turkey stand). Seal the pouch well.
- Close the cuff the same way you did the feather gloves (sew or no-sew).
- Form the head:
- Fold the thumb forward toward the front of the palm so it sits like a turkey head.
- Tack the base of the thumb to the front of the palm with a few stitches or a small dot of hot glue (adults only). Add a little extra stuffing into the thumb before securing if you want a rounder head.
- Attach the feather gloves as a tail:
- Arrange the two stuffed feather gloves behind the brown glove so their finger “feathers” spread out like a fan behind the body.
- Sew across the cuffs where the gloves meet the back of the brown glove, stitching through all layers to anchor them. If you prefer no-sew, use a generous line of hot glue along the seam and press together until set (use hot glue carefully).
- Shape the tail: spread and fan the fingers of the feather gloves. Trim tips if desired for a rounded or stylized look.
- Check balance & finish: set the turkey on a flat surface. If it tips forward, add more weight to the base pouch or adjust stuffing so the bottom is flat. Reinforce attachment stitches if the tail feels loose.
Troubleshooting tips
- If fingers flop: insert a narrow strip of cardboard or a pipe cleaner inside each finger before closing the cuff to stiffen them.
- If the turkey won’t stand: add more weight in a sealed pouch in the base or press the bottom flat to increase surface contact.
- Want a no-sew version? Use strong fabric glue throughout and replace tiny sewn details with glued felt shapes; allow full drying time.
Decorating Your Glove Turkey
- Attach eyes:
- Glue on small buttons, googly eyes, or felt circles for eyes just above the thumb-head. Sew buttons on for durability if the turkey will be handled a lot.
- Make a beak & wattle:
- Cut a small triangle from orange or yellow felt for the beak; glue or stitch it onto the thumb (head).
- For the wattle, cut a small teardrop of red felt and glue it just below the beak, or twist a short piece of red pipe cleaner and attach with glue.
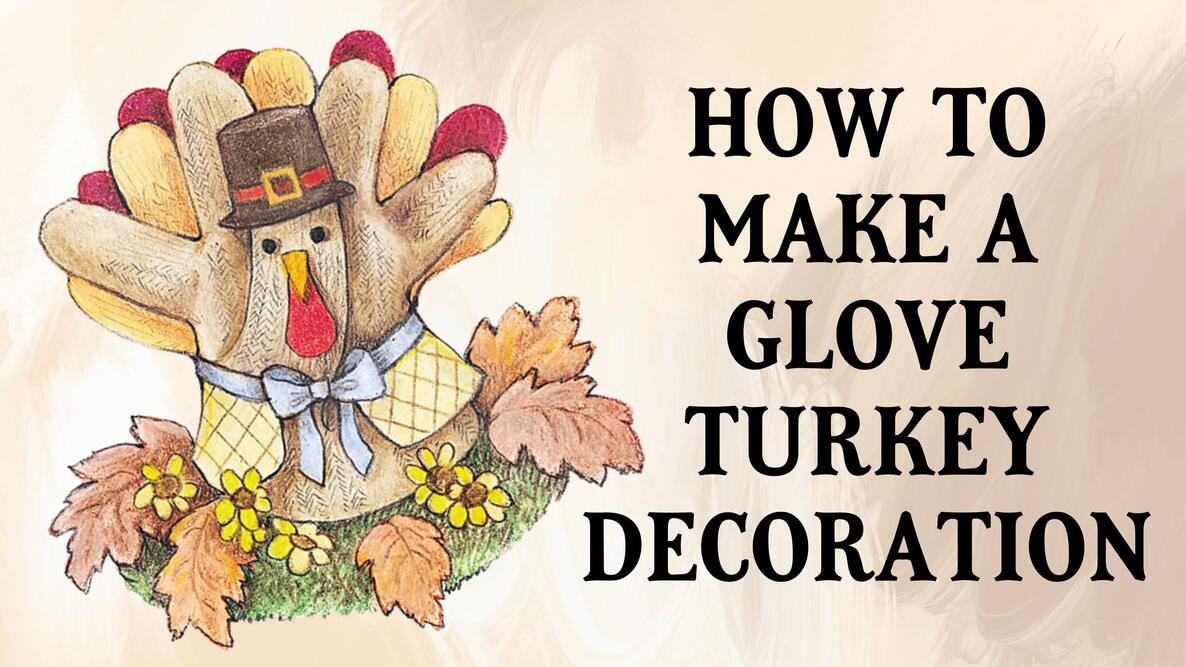
- Add a hat or accessories:
- Pilgrim hat: cut a small felt circle for the brim and a short rectangle or cone for the top; glue together and place on the head.
- Scarf or bow tie: use a scrap of ribbon, fabric, or felt to tie around the neck area (secure with a dab of glue).
- Vest: cut a small vest shape from felt and glue to the front of the body.
- Legs & feet options:
- Twist two pipe cleaners for legs and feet and poke them gently into the bottom of the body; secure with a glue dot inside.
- Alternatively, cut two “boot” shapes from felt and glue them to the base to simulate feet.
- Embellish the tail:
- Glue on sequins, small paper feathers, ribbon strips, or paint the fingertips for a decorative look.
- Attach small leaves, acorns, or faux berries between the finger “feathers” for an autumn centerpiece feel.
- Final touches & display:
- Put your glove turkey on a shallow plate or platter and arrange faux moss, dried leaves, and small gourds around it for a polished centerpiece.
- Make a family of glove turkeys in different colors and sizes for a charming table scene.
Safety & care notes
- Small parts (buttons, beads) are choking hazards—avoid for very young children or supervise closely.
- Use hot glue only with adult supervision. For kids, better to use fabric glue or a needle and thread.
- If you used a weight pouch of beans/rice, keep it sealed and out of reach of pets and toddlers.

Illustration by Margo Letourneau


Comments