

Short on space? One pot is all you need to enjoy homegrown, flavorful tomatoes! Growing tomatoes in pots is great for a patio, balcony, or small deck. Plus, container gardening gives you more control over soil, drainage, and sun exposure, making tomatoes accessible to even beginner gardeners. Here are my tips and tricks, from choosing the right pot to planting and care.
Benefits Of Growing Tomatoes In Pots
Being able to pick flavorful, ripe, homegrown tomatoes is one of the main reasons for having a summer garden. But what if you lack enough space in the garden or perhaps don’t even have a yard? Have no fear, containers are here!
I love container gardening because it makes growing tomatoes simple and flexible. You can grow anywhere there’s sun, control the soil mix, and even move plants to follow the light. Pots can also reduce some common soil-borne problems and make watering and fertilizing easier.

Successfully Grow Tomatoes in Pots
Best Location
- Your tomato pot will need as much sun as it can get, at least 6-8 hours of direct sunlight a day. One good thing about container growing is that you can move the plant to take advantage of your sunniest spots. Put it on casters to make it easier to move.
- If you place your pot in a position that gets full sun (south or southwest in many regions), you’ll get better fruit set and ripening. Container plants can be moved as needed to catch more sun or avoid shading.
- Also, avoid shady spots or places with too much wind or cold drafts, because pots can cool or warm more quickly than the ground soil.
Best Varieties for Container Gardening
After years of trial and error, I’ve found that not every tomato thrives in a pot. There are two basic types of tomato plants: determinate (bush types) and indeterminate.
- Determinate/bush types are often ideal for containers. They are compact rather than lanky, rarely grow taller than 3 feet, and all their fruit matures over a limited window.
- Indeterminate tomatoes are usually unsuitable for container growing. They don’t know when to stop. They just keep on growing and producing fruit until freezing weather kills them.
Dwarf or mini-varieties are smaller versions of determinate varieties that are excellent for growing in a hanging basket, window box, or on the kitchen counter. When shopping, look for ‘bush’ or ‘dwarf’ in the plant’s name. Here are some determinate slicers and salad tomatoes that we have grown in the past with good results:
- ‘Patio Princess’ – A tidy, dependable variety that yields clusters of small, saladette-size tomatoes with good flavor. Productive all season long, and it looks right at home on a sunny balcony or deck. Benefits from light support.
- ‘Window Box Roma’ – A perfect choice for sauce lovers. This small, paste-type tomato packs impressive yields from a 14-inch container and usually doesn’t need staking. The flavor is mild but useful for cooking or canning.
- ‘Super Bush Hybrid’ – Among the earliest and most productive container slicers. Medium-sized fruits with a full tomato flavor, and a nice, compact growth habit. Add a cage for best results.
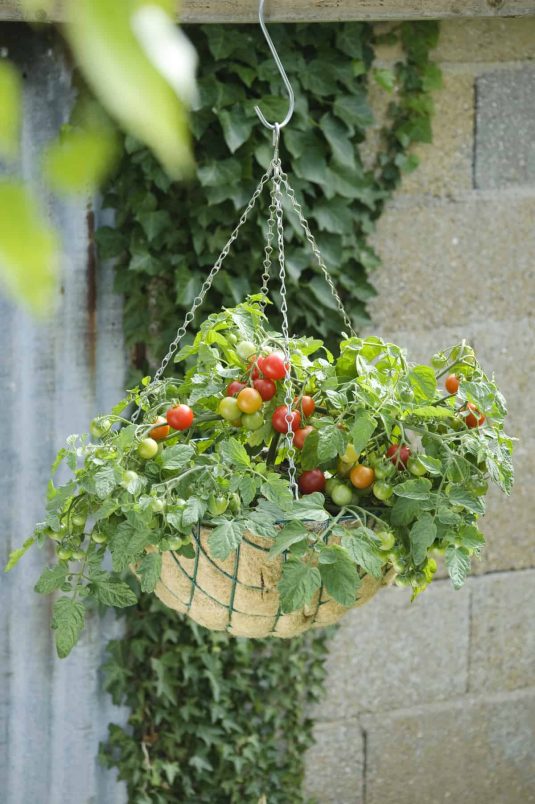
- ‘Tumbler’ – Cherry Tomatoes. Ideal for hanging baskets or small pots. These tiny plants yield cascades of cherry tomatoes. You can plant up to three in a 14-inch pot. The flavor is light, but it’s unbeatable for ease and ornamental appeal.
- ‘Tiny Tim’ – Cherry Tomatoes. A true miniature variety that grows only about a foot tall and produces loads of sweet red cherries. Ideal for balconies or even indoor sunrooms.
Choosing the Right Pot
This part really matters.
Size: Go big! Unless you are growing a dwarf tomato plant, which will happily grow in a hanging basket, you will need at least a 5-gallon-sized pot (bigger is even better!). Healthy roots are essential for a healthy, productive plant, so a large pot is necessary to give the roots room to grow. If you are not sure, use our pot size calculator.
Type: Anything that holds enough soil and has adequate drainage will work. Plastic or resin pots are practical because they hold moisture longer and are easier to move. Terra cotta is pretty, but it tends to hold heat and dry out quickly. Filled with soil, it can be heavy and difficult to move. Yes, plastic is not as attractive, but it is more practical. It is lighter in weight and holds moisture longer. Dark-colored pots of any type heat up in the sun and can cause the soil to overheat, so look for light-colored pots.
Drainage: Make sure your pot has several holes in the bottom. Tomatoes hate “wet feet.” Good drainage keeps roots healthy. If your pot doesn’t drain, drill holes before you plant!

Soil for Containers
One of the joys of container gardening is the control you have over the soil you use. Do NOT fill your pot with garden soil. It is too heavy and may harbor insect eggs and soil-borne diseases.
Use a “soilless” potting mix (which will contain peat, compost, or coir blended with perlite or vermiculite for good aeration). If you can’t find a sterile potting mix with compost or aged manure, add it yourself to give the soil life and trace nutrients. A common proportion is 1 part compost to 2 parts potting mix. Read more in our Container Gardening for Beginners Guide.
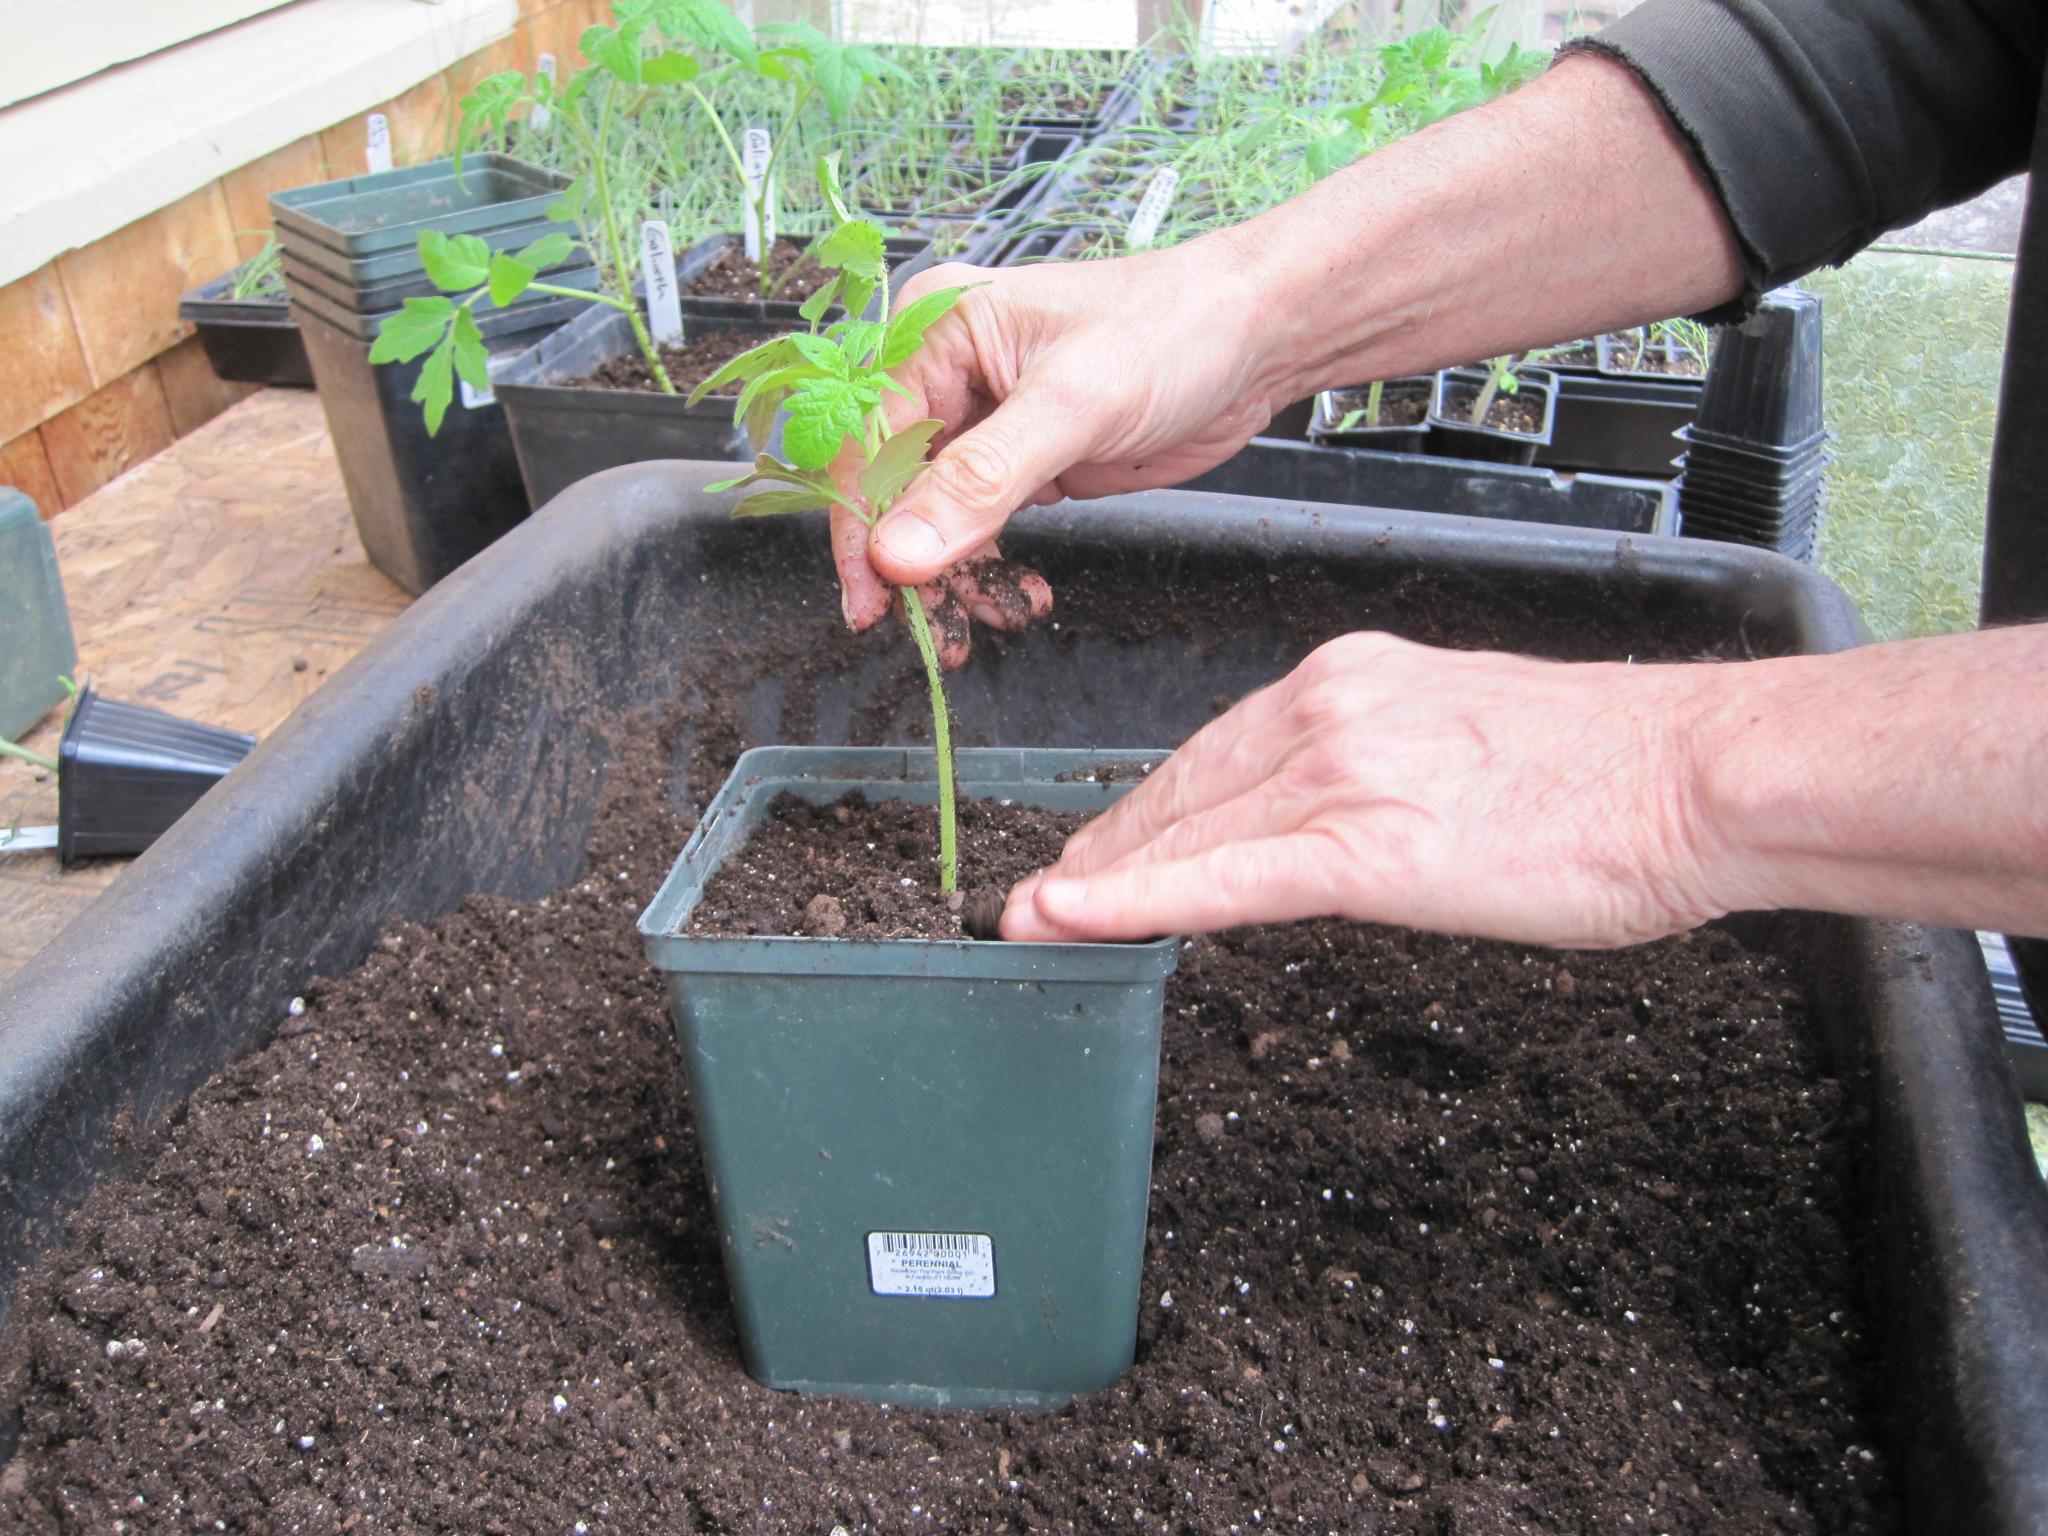
Planting (and When to Plant Tomatoes in Pots)
Timing is everything. Don’t start too early unless you are prepared to protect your plant on a cold night; otherwise, wait until night temperatures are reliably above 55°F before moving your pots outdoors.
When planting, I always bury the tomato deeply—up to the first set of leaves. Tomatoes grow new roots along their buried stems, creating a stronger plant. See more tips on planting tomatoes!
Adding Support
Even determinate and dwarf tomato plants benefit from a little support in a pot. Stakes or small cages help keep plants upright, reduce stress on the stems, and make harvesting easier.
- Stakes: Insert a sturdy stake into the soil at planting time. Tie the main stem loosely with soft garden twine or plant ties as it grows.
- Cages: Small tomato cages work well for determinate or dwarf varieties. Place the cage over the plant when it’s young so you don’t damage the roots later. Make sure supports are deep and stable, as container tomatoes can become top-heavy when fruiting.
Mulching
A light mulch layer—like straw or shredded leaves—helps keep the soil moist and cooler on hot days. I wait until the soil warms up before mulching, then add an inch or two around the base of the plant. You can calculate exactly how much mulch you need using our tool.
Watering
This is where most people struggle. Tomatoes in pots dry out much faster than those grown in the ground. I check mine daily in warm weather and water deeply whenever the top inch of soil feels dry. Avoid cycles of bone-dry to soaking-wet soil—it can cause blossom-end rot and cracked fruit. A drip system or self-watering pot can help keep moisture steady.
Water slowly and deeply, allowing the water time to sink in and not just run off. Frequent light waterings, which encourage shallow root growth, make for a weak plant. Water slowly until it drains out the bottom. This ensures the roots get evenly moist soil, not just a quick surface drink. To prevent root rot, it needs to drain. Don’t let water sit in a saucer. Be sure to water the soil, not the plant, to discourage foliar diseases. See more tips on avoiding tomato disease and problems.
Fertilizing Tomatoes in Containers
Tomatoes love nutrients—especially in containers, where watering can wash them away. A simple, stage-based feeding plan will help you grow strong plants and a bountiful harvest without confusion.
At Planting (Transplanting Seedlings):
- Mix a slow-release tomato fertilizer like Espoma Tomato-tone (3-4-6) into your potting mix. This gives your plants a steady supply of nutrients for the first few weeks. Mix some into your potting soil or sprinkle in the planting hole.
- Optional: add a little bone meal in the planting hole for extra phosphorus to encourage strong roots.
- Check that your soil or mix has a pH near 6.5. If it’s too acidic, a pinch of garden lime can help balance it.
Early Growth (2–3 Weeks After Planting):
- Once your plants are settled and the initial fertilizer starts to run out, start feeding with a liquid fertilizer like fish emulsion or seaweed extract.
- With containers (vs in-ground tomatoes), nutrients wash out faster so start 2 to 3 weeks after planting.
- Apply every 1–2 weeks, following the label directions for dilution. These feeds are gentle and help your plants grow strong leaves and stems without overwhelming them.
Flowering and Fruit Set:
- When flowers appear and fruit begins to form, resume applying Espoma Tomato-tone (3-4-6) for ongoing nutrition.
- Apply twice a month (or feed with liquid fertilizer every 2 weeks) to keep your tomatoes well-nourished.
| Stage | Fertilizer | Notes |
|---|---|---|
| At planting | Slow-release tomato fertilizer (e.g., Espoma Tomato-tone 3-4-6, or another balanced tomato fertilizer) | Mix into potting mix to give seedlings a nutrient boost |
| 2–3 weeks after planting | Liquid fertilizer (e.g., fish emulsion, seaweed extract, or other mild liquid tomato feed) | Apply every 1–2 weeks; helps plants grow strong leaves and stems |
| Flowering & fruiting | Slow-release tomato fertilizer (same as above) | Side-dress or sprinkle every 2 weeks to support healthy fruit production |
Beginner Feeding Tips
- Tip: You don’t need to buy three different products. One slow-release tomato fertilizer plus an optional liquid feed covers all stages.
- Keep soil evenly moist—containers dry out fast, and uneven watering can stress the plants.
- Mulch with straw or shredded leaves to reduce water loss and keep roots cool.
- If you’re unsure about your soil or potting mix, a soil test can help you see if more nutrients or pH adjustments are needed.

Pruning Tomatoes in Pots
When growing tomatoes in containers, determinate and dwarf varieties are recommended. Pruning is generally not needed, as both are bred for compact container growth. You can remove very small suckers if you wish, but it is optional. Focus on supporting the plant with stakes or cages rather than extensive pruning.
Harvesting Tomatoes in Containers
For determinate container varieties, harvesting is typically concentrated over a short period. Harvesting tomatoes at the right time ensures the best flavor and texture. Here’s how to determine when your tomatoes are ready:
- Color: Ripe tomatoes exhibit their characteristic color—red, yellow, or orange—depending on the variety.
- Feel: Gently squeeze the tomato; it should yield slightly to pressure, indicating ripeness.
- Ease of Removal: Ripe tomatoes should detach easily from the vine.
See the Almanac’s complete guide to growing and harvesting tomatoes in the garden!
Frequently Asked Questions About Growing Tomatoes in Pots
Q: What size pot is best for a tomato plant?
A: For determinate (bush) varieties, you’ll need at least a 5-gallon pot for one plant. For dwarf or mini varieties, slightly smaller containers can be used, but make sure there’s enough soil to support root growth. Pots must have good drainage to prevent waterlogging.
Q2: Which tomato varieties grow best in containers?
A: Determinate and dwarf varieties are ideal because they stay compact and produce fruit over a short period. Examples include ‘Patio Princess,’ ‘Bush Early Girl,’ and cherry-type dwarfs like ‘Tiny Tim.’ Indeterminate varieties are generally not recommended for pots because they grow tall and require larger support systems.
Q3: What’s the best soil or potting mix for container tomatoes?
A: Use a lightweight, well-draining potting mix designed for vegetables. You can mix in compost or other organic matter for extra nutrients. Avoid using garden soil, which can compact in pots and hinder root growth.
Q4: How often should I water tomatoes in a pot?
A: Container tomatoes dry out much faster than in-ground plants. Water when the top inch of soil feels dry, usually every 1–2 days in hot weather. Ensure water drains freely from the pot to prevent root rot.
Q5: How do I prevent nutrient deficiencies in container tomatoes?
A: Container tomatoes need regular feeding because nutrients leach out quickly with frequent watering. Use a slow-release tomato fertilizer at planting, then supplement with a liquid fertilizer every 1–2 weeks throughout the growing season.


Thanks for catching that! We've updated the photo in question.
Comments