How to Grow and Care for Bromeliads

Bromeliad (Veriesea)

Caption

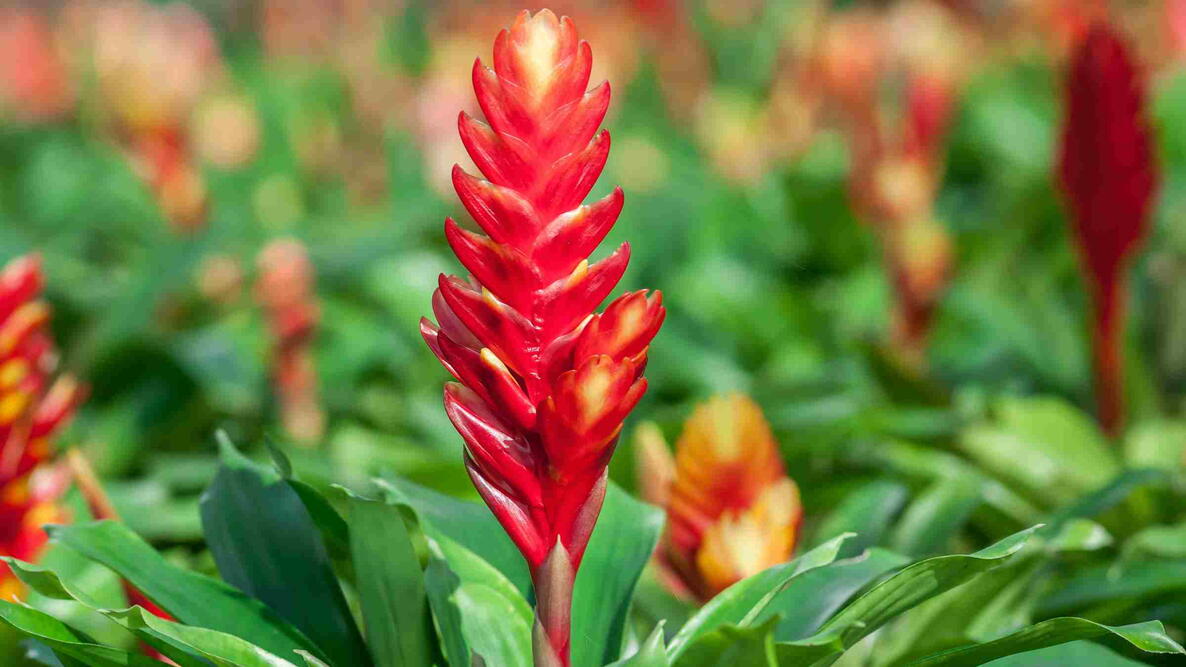
The flame bromeliad (Vriesea) lives up to its name—bold, bright, and ready to light up any room with tropical flair.

Photo Credit
C. Aphirak
Botanical Name
Bromeliaceae spp.
Plant Type
Sun Exposure
Soil pH
Bloom Time
Flower Color
Hardiness Zone
Special Features
Subhead

Planting, Watering, and Growing Bromeliads Indoors

Written By: Lauren Landers Master Gardener and Contributing Writer

Growing bromeliads in your home makes life a bit sweeter—especially if one happens to be an ornamental pineapple! The bromeliad family also includes air plants and many other popular houseplants. Despite their tropical looks, most bromeliads are surprisingly easy to grow indoors. I’ve kept a variety of bromeliads over the years, and here are the best growing tips I’ve learned, plus common pitfalls to avoid if you want your bromeliad plants to thrive for years.

About Bromeliad Plants

Native to North, Central, and South America, the bromeliad plant family is a diverse group with around 3,700 distinct species. Some bromeliads are terrestrial and grow in soil like most plants, but the vast majority are epiphytes that attach to trees or nestle in rock crevices, drawing nutrients and moisture from the surrounding air. When cultivated as houseplants, bromeliads don’t necessarily need pots or traditional soil.

With so much diversity in the family, there’s no one-size-fits-all care regimen for bromeliads, but most prefer bright, indirect light and high humidity. Many bromeliads have solid green leaves that form in a tight rosette, and small, inconspicuous flowers that bloom just once within large, showy bracts. After flowering, bromeliads usually die away, but they’ll often produce babies or “pups,” which you can separate from the parent plant and keep growing.

Although most bromeliads have green leaves, some varieties have striped or speckled foliage, and modern growers can find thousands of cultivars and hybrid plants with unique patterns and colors. I enjoy mixing and matching different bromeliads in my houseplant collection to showcase their variety, often pairing them with orchids, which have similar care requirements. With bromeliads ranging in size from diminutive 2-inch tall specimens to taller varieties that stretch up to 4-feet high, there’s a bromeliad for everyone and every home!

 Beautiful colorful bromeliads plant in nature.
Beautiful colorful bromeliads plant in nature. Credit: Julia Carestiato

Planting

Planting techniques vary depending on the type of bromeliad you’re growing, but some basic guidelines apply to almost all.

  • Do your research: Do your research: Most bromeliads grow best in dappled or bright, indirect light with a well-draining, soil-free potting mix. Epiphytic bromeliads, such as air plants, don’t need soil at all, while fully terrestrial types may prefer a standard houseplant mix.
  • Check for pests: Whenever I bring a new plant into my home, I always scrutinize it for pests like mealybugs or scale. If I spot any unwanted intruders, I treat them with a Q-tip dipped in rubbing alcohol or spray the entire plant with organic soap spray.
  • Choose a well-draining potting mix: If you’re growing a standard epiphytic bromeliad, select a well-draining pot and a coarse, soil-free potting mix. I usually grow bromeliads in a store-bought orchid bark potting mix. Still, you can also make your own bromeliad substrate by blending equal parts of bark, rehydrated coconut coir, and either sand or perlite.
  • Plant right: Standard bromeliads can be planted just like other houseplants by burying their root ball at the same depth the plant was growing in its nursery pot. You may want to wear gardening gloves when working with these plants, as some have spiky leaves that can scratch.
  • Try soil-free options: Air plants can be mounted on bark, driftwood, or displayed in terrariums. I like to mount my plants either by balancing them on a stand or loosely securing them with fishing line. I never use glue, as this can cause plant damage.

Growing

Because they have short root systems, bromeliads actually grow better when they’re confined to relatively small pots. When selecting a container for potted bromeliads, look for a well-draining pot or planter with drainage holes in the base and that’s only slightly wider than your plant. I usually keep bromeliads in terracotta pots that allow extra moisture to wick away from their roots; however, these plants also work well in hanging baskets, terrariums, and humidity-controlling grow cabinets.

Water
Watering is the trickiest part about keeping bromeliads, but it doesn’t need to be overly complicated. Many of these plants have water reservoirs or “tanks” at the center of their leaves, which the plant uses to supplement the water it draws up from its roots.

√ If you’re growing bromeliads in pots, water the soil lightly when the top 2 inches of potting mix feels dry to the touch, or fill up the “tank” at the center of the plant with just enough water to last the plant for 2 days. If possible, use distilled or rainwater instead of tap water to prevent salt buildup and leaf spotting.

√ Indoor bromeliads rarely need their soil and their “tanks” filled at the same time, but those water tanks should be emptied regularly to prevent rot.

√ Air plants and other bromeliads that are not grown in potting mix usually like to be misted regularly, and then soaked in a bowl or sink filled with water for about 30 minutes once a week. Let the plants drip dry on a towel, and then return them to their growing spot when you’re done..

Light
Some bromeliads tolerate more light than others, but most grow best in the bright, indirect light from an east- or west-facing window. Too little light can cause bromeliads to lose their vivid color, while too much direct sun may scorch leaves.
Humidity
Bromeliads tolerate standard indoor humidity levels, but they grow better when humidity levels are at 40% or higher. If needed, you can increase humidity with a humidifier, a pebble tray, or by grouping plants together. Bathrooms and kitchens often have naturally higher humidity levels.
Temperature
Standard indoor temperatures are a-okay for bromeliads, and these plants grow best if they’re kept at a consistent 60 to 85°F year-round. Some varieties can tolerate temperatures as cool as 40°F for short periods, but bromeliads won’t survive frost. They should be kept away from drafty windows, A/C units, or heating units.

Fertilizer

Bromeliads are light feeders. Most will do fine without fertilizer if repotted every 2 to 3 years. For a boost, apply a diluted, balanced orchid or houseplant fertilizer once a month during spring and summer. Avoid overfertilizing, which can damage the leaves.
Toxicity
Pet lovers rejoice! All bromeliads are non-toxic to pets.

Pests/Diseases

Most pests avoid bromeliads. The majority of problems that arise with these plants are caused by overwatering or watering in the wrong way.

  • Overwatering: The #1 problem, leading to root rot and mushy leaves. Also, ensure water reservoirs aren’t emptied from time to time. Use the right well-draining potting substrate.
  • Pests: Mealybugs, scale, and aphids may appear, especially on outdoor bromeliads. Treat with insecticidal soap or rubbing alcohol.
  • Water quality issues: Tap water often leads to leaf spotting and salt buildup. Stick with distilled or rainwater.

Potting and Repotting

How Often to Repot

Bromeliads don’t mind being a little crowded in their pots and only need to be repotted every 2 to 3 years.

When to Repot

You can repot bromeliads at any time of the year, but spring is ideal!

How to Repot

  • Remove the plant: Gently grasp the base of the bromeliad leaves in one hand and wiggle the plant’s pot free with your opposite hand. I always wear gloves for this, as bromeliad leaves can be sharp.
  • Dust off the roots: Once the plant is out of its pot, remove as much of the old potting mix from its roots as you can.
  • Repot: Pot up your plant at the same depth it was growing in its old container and water well. When I grow bromeliads without substrate, I like to anchor them with fishing twine instead of glue. 

Propagation

Bromeliads are monocarps, which means they bloom just once and then die. Propagation is key to keeping your collection alive.

  1. Wait until pups are at least ⅓–½ the size of the parent.
  2. Use a sharp, sterilized knife to separate the pup from the base.
  3. Pot the pup in the same way as the parent plant—either with or without potting mix, depending on the type of bromeliad you’re growing.

Seasonal Care

If you keep bromeliads outdoors in summer, bring your plants back inside before temperatures get too chilly. These plants need more water during the growing season and should not be fertilized in fall or winter. I recommend not attempting to force bromeliads to flower as this is often ineffective and can shorten the lifespan of your plant.

Summer: Bromeliads need more water during active growth.

Fall/Winter: Reduce watering and skip fertilizer.

Cold weather: Bring outdoor bromeliads inside before temperatures drop below 55°F.

Wit and Wisdom

  • “Tank” bromeliads have a small vase-like cup in the center of their leaves, which these plants use to capture dew and rainwater.  In the wild, these plants create tiny ecosystems in their leaf cups, hosting hundreds of animal and insect species, including spiders, millipedes, beetles, crabs, salamanders, and tree frogs!
  • Wild bromeliad flowers evolved to attract pollinators, like insects, hummingbirds, and bats. Some are wind-pollinated too.
  • Pineapples, the most famous bromeliads, were once rare luxury items. The first pineapples transported from the New World were considered to be status symbols and were often displayed prominently. Today, pineapple designs are frequently featured on gates and home entrances as symbols of welcome and hospitality.

About The Author
Lauren Landers

Lauren Landers

Master Gardener and Contributing Writer

Lauren is a gardener, writer, and public speaker with over a decade of experience helping others learn about gardening, homesteading, and sustainable living.She combines years of practical gardening a...